How to Use Wireless Sync in iOS 5
 The new wireless sync feature of iOS 5 unshackles your iPhone and iPad from your PC, allowing you to wirelessly sync your devices via Wi-Fi. Here's how to set it up.
The new wireless sync feature of iOS 5 makes syncing your iPhone, iPad, or iPod Touch via Wi-Fi with a computer running iTunes an easy matter. To get started, make sure you’ve synced your iOS 5 device with your computer via cable at least once; also make sure you allow iTunes to wirelessly sync with your device by selecting “Sync with this iPhone over Wi-Fi”. From here on out, you should be able to sync the device wirelessly with your computer by following the steps below.
1. Make sure your computer is connected to a wireless network and is running iTunes.
2. Your device needs to be plugged in to initiate Wi-Fi Sync, so make sure you connect it to a power source via dock or power adapter. Having a portable charger or an extended battery attached to your device should also do the trick.
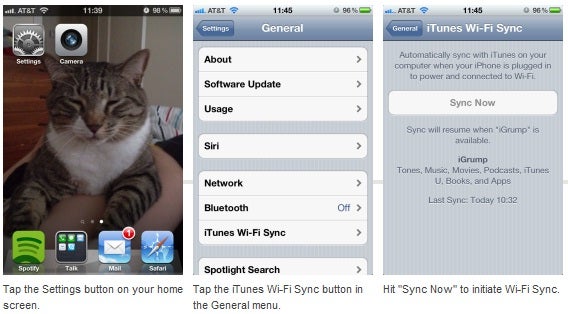
3. Open the Settings menu by tapping the button on your iOS 5 home screen.
4. Navigate to General, iTunes Wi-Fi Sync.
5. At this point, you should see a list of all computers available on the Wi-Fi network. Select the computer you want to sync with, and tap the Sync Now button.
Congratulations! If you’ve done everything correctly, your device should sync wirelessly with your computer, and will now do so automatically whenever you have your device plugged in and connected to the same Wi-Fi network as your computer.
For professional and affordable IT tech support, feel free to contact us at Farend, for no obligation quotation.
The above article was originally published by PC World and can be seen here.

