Microsoft Word Productivity Tips
 Improving your productivity on Microsoft Word is one of the most important and the most neglected aspects of corporate life. The problem here is not that people aren’t aware of the importance of productivity; rather, it is that people aren’t aware of the fact that they are not productive. In fact, most people I have come across who say, “yes, I know how to use MS Word” usually just know about “Ctrl B,” “Ctrl C,” and “Ctrl U.” They don’t even know how much more there is to MS Word — or any capable word processing program such as OpenOffice.org.
Therefore, today I’ll focus on highlighting some of the productivity tips that can effectively make the use of mouse obsolete on MS Word for most users.
Inserting Dummy Text for Practice
In order to play around with a word processor and understand its various formatting options, shortcuts — basically, the works — it is very important to have a quick way of inserting dummy text on which you can experiment.
Luckily, the makers of Word have created a simple formula for you to achieve just that: =rand(<number of paragraphs>,<number of sentences in each paragraph>)
This means that if you write “=rand(5,4)” and hit “enter”, it will create 5 paragraphs of random text, each of which will contain 4 sentences in it.
Now you can start playing.
Selecting the Text
Doesn’t sound like much, does it? However, here are a few things that surprisingly few people know:
- When you keep the Ctrl key pressed and click on the left or right arrow keys, the cursor jumps a full word instead of a letter it would jump otherwise. This is a much quicker way of reading through each word of text while editing it
- When you hit “Shift+Home”, it selects all the text towards the left of your cursor right till the beginning of the line. And when you replace “Home” with the “End” key, it selects all the text to the right of your cursor all the way to the end of the line
- When you hit “Shift+Ctrl+Up”, it selects the entire part of the paragraph before the cursor; when you replace the up arrow key with the down one, it selects the entire part of the paragraph after the cursor
Aligning the Text
Okay, perhaps many of you already know this, but I’m sure there are some out there who would appreciate this tip:
- “Ctrl+L” aligns the text to the left
- “Ctrl+R” aligns the text to the right
- “Ctrl+E” aligns the text to the center
- “Ctrl+J” does something called as “right justification.” What this means is that the right margin of the paragraph gets neatly aligned in one vertical line just like its left margin, giving it a very polished look. Many companies prefer to use this type of alignment for all their documents
Changing the Font
Select the text you wish to change and hit “Alt+Shift+F”. You’ll see that the font box in the toolbar gets highlighted automatically. When that’s done, just start typing the name of the font you wish to apply and it will automatically suggest you the most likely option. When it does, hit “enter”.
Changing the Font Size
A number of people have different preferences for the ideal font size. Perhaps you prefer to keep things in “Arial” point 10, while the person sending you the document may not have graduated from the default “Times New Roman” point 12. Not that I’m suggesting it’s a bad font; it’s just that none of the corporate entities I’ve known ever keep it as their default font for paragraph text.
In such cases, once you change the font back to Arial using the previous tip, keep the selection of the text on. In case you’ve lost that, select the desired text again, and hit “Ctrl+[”. This will reduce the font size by one point. Hit it again to further reduce the size. In order to increase the size, you need to hit “Ctrl+]”. This does the exact opposite and increases the font size by one point.
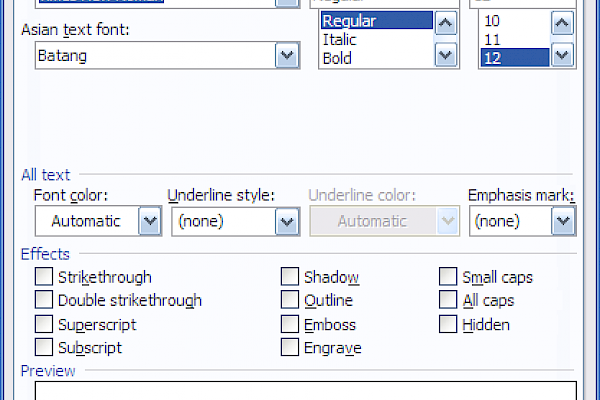
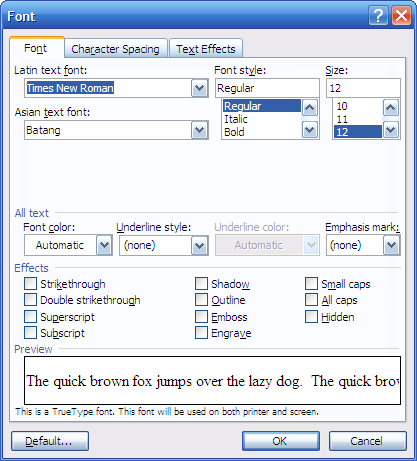
More Comprehensive Font Formatting
It’s possible that you need to do more than just change the font type and size. For example, you need to use Small caps or have more effects applied to the text. There’s a simple way to find all those options — just select the desired text and hit “Ctrl+D”. This will open up a dialog box using which you can apply a whole bunch of formatting options to your text.
Shortcut for Headings
Are you one of those who just bolds the text and increases the font size in order to create a heading? Don’t do that for three reasons:
- it’s really cumbersome to do it manually every time
- you can’t create a table of contents (TOC) from those headings automatically, and
- it’s really lame
Did point “b” grab your attention? Yes, if you use the built-in or user-defined heading styles in your document, you can create an entire table of contents automatically. This automatically generated TOC creates hyperlinks on the headings so that you can navigate to any point in your document by simply clicking on the required heading in the TOC. It also automatically updates the page numbers and the text for those headings should you happen to change something in your document at a later point. How cool is that!
Now let’s start with the actual shortcuts:
- Heading 1: Ctrl+Alt+1
- Heading 2: Ctrl+Alt+2
- Heading 3: Ctrl+Alt+3
By default, shortcuts for headings are available only till Heading 3; and for the most part, that is more than enough. You rarely ever require a Heading 4; and if you do, you can select it from the style menu in the toolbar at the top. Since Heading 4 is not as frequently required, there’s not much loss or gain in productivity either way. Of course, you can always create your own custom shortcut for it if you think it’s important for you.
Eliminating Double Paragraph Spaces
Have you noticed that a number of people who do not know or do not care about defining the paragraph spaces just leave a blank line between two paragraphs. However, if you’re one who does care about that and have just received a file from someone who doesn’t, you’d end up with a mile-long gap between the paragraphs with your settings.
In such cases, it’s very easy to fix things using the “Find and Replace” function. Hit “Ctrl+H” on your keyboard, and it will automatically pull up the find and replace dialog box. In the “Find” field, enter “^p^p”, and in the “Replace” field, enter “^p”. You have probably guessed that “^p” stands for the “end of paragraph” character. In other words, what our little operation does is replace each of the two “end of paragraph” symbols with one, thus eliminating all the blank lines in your document. To execute this command, hit “Alt+A”, and it will do the replacements throughout the document.
AutoFormat the Entire Document
Most organizations have their own styles requirements, for example, some organizations discourage the use of smart quotes and other special characters such as an ellipsis, an em-dash, etc. However, that may not be the case with your organization. And when a person from such an organization sends you a document, it could stick out as a sore thumb among your other documents.
In such cases, having pre-defined autocorrect options can save you a lot of time. You can change those options by hitting “Alt+T+A”. A window pops up with a number of tabs in it.
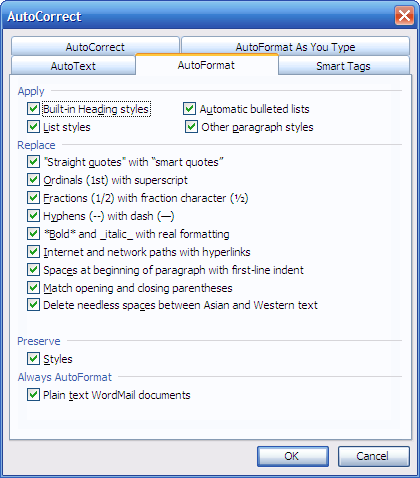
Select the “AutoFormat” tab and you’ll all the options that can be automatically applied. Once you selected all the changes you want to apply, close that window and hit “Alt+O+A”. Here’s a window that opens up once you do that:
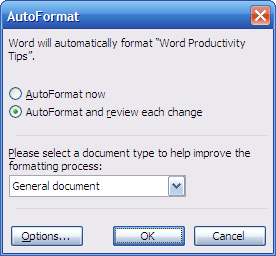
Here, if the second option “AutoFormat and review each change” isn’t already selected, I strongly suggest you select it. As soon as you hit “enter”, Word will automatically do all the replacements –straight quotes with smart ones, two hyphens with an em-dash, three dots with an ellipsis, etc. It will also give you the option of reviewing each of the changes, and accepting or rejecting it as per your requirements.
Even when dealing with single page of text, this option can save you a number of valuable minutes.
Changing the Case
Okay, how many times have you seen unscrupulous people create headings with the wrong case? For the most part, they need to be in something called as “Title Case,” don’t they? In other words, “Microsoft word productivity tips” should be written as “Microsoft Word Productivity Tips” when it’s the heading of a document.
Sometimes, it could also be the other way around where you need to change a piece of text to all caps, or make it all in lower case.
In MS Word, you can easily do that by selecting the desired text and hitting “Shift+F3”. Every time you hit this combination, it changes the text in this order — all caps, all lowercase, title case. In other words, if your selected text is in all caps already, it will first change it to lowercase, and if you hit the combination again, it will change it to title case.
When trying to change the case for a single word, you do not even have to select the entire word. Just ensure the cursor is somewhere on the word — the beginning or the middle — and hit “Shift+F3”.
Going Back to the Default Paragraph Style Setting
When you’re making some formatting changes to a paragraph and you realize that you’ve done something wrong. In such a case, most people would end up hitting “Ctrl+Z” a bunch of times till the text goes back to the way it was earlier.
However, there’s a shortcut that can help you do that in less than a second. All you have to do is select the whole paragraph — or the part you need to change back — and hit “Ctrl+Spacebar”. This will change that text back to the default paragraph style that was applied to it when you started out.
This works for Headings as well. If you select to a “Heading 1” type of text and hit “Ctrl+Spacebar”, it will go back to the default Heading 1 formatting of the style that was initially applied to it.
Inserting Table of Contents
Once you’ve written the entire manual or report, perhaps it’s time to insert the table of contents. You can do this by using this combination — “Alt+I+N+D”. This will open up the following window:
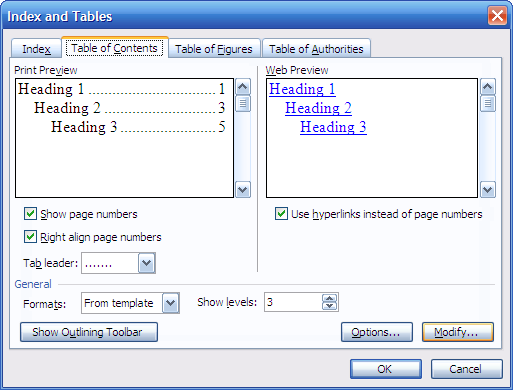
In case you have Word 2007 or 2010 and would like to do this using your mouse, you can go to the “References” tab and use the “Table of Contents” group. In case you have used the default styles, simply going with the default options will create a neat TOC for you where the cursor is in the document.
I hope you find these tips useful. Of course, I have barely even scratched the surface when it comes to all the things you can do in Word such as inserting references, inserting tables automatically, creating your own templates, creating your own shortcuts, inserting fields, headers and footers, page layouts, and much more.
Many of these topics justify an entire dedicated article on each of them; therefore, I couldn’t include all of those in this post today. Perhaps some other time.
Until then, here’s to a great productive time for all of us!
Although the images I have used have been taken on Windows XP and MS Office 2003, all the subsequent versions of MS Office are backward compatible with these shortcuts. If you find that’s not the case with any of these in the latest version of MS Word, please feel free to leave a comment. We would also love for you to share your own Word productivity tips.
The above article was originally published at:http://www.testking.com/techking/tutorials/microsoft-word-productivity-tips/